


Installing Kali Linux on a Beaglebone Black
While there are plenty of articles on all the great things you can do with Raspberry Pi’s, there aren’t a lot of articles on the Beaglebone Black just yet. The Beaglebone Black has an advantage over the Raspberry Pi with it’s 1 GHz processor speed and onboard flash storage. I use a Kali Linux VM quite a bit in analyzing mobile application security so it might save time having Kali running on a Beaglebone or running on an army of Beaglebone/Raspberry Pi’s or hack servers for the security lab!
Kali has great support for Software Defined Radio (SDR) on the 32/64-bit distros so it seems like a great place to start for a SDR platform. In addition to installing some security tools, we’ll be installing some SDR packages for fun.
To install Kali Linux, you will need at least an 8 GB micro SD card, class 10 or better. At the time of this writing, 16 GB micro SD cards were in the cost sweet spot. Begin by formatting the SD card as FAT32 using SDFormatter for Mac or Windows, a free download from the SD Association: https://www.sdcard.org/downloads/formatter_4/
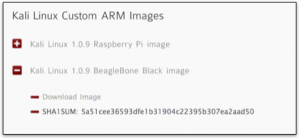
Next, download the latest custom ARM image for the Beaglebone by visiting the Kali download site http://www.offensive-security.com/kali-linux-vmware-arm-image-download/ Click on Beaglebone which will display the download link and SHA1SUM. Click on “Download Image”
Once the download is completed, you should find a file named “kali-1.0.9-bbb.img.xz” or similar depending on the version number. It’s always best to check the SHA1 checksum. On the Mac, open Terminal by clicking on the Spotlight search magnifying glass and start typing “Term” and it should find it. Press enter. From Terminal change to the ~/Download directory or wherever you stored it. To check the SHA1, type openssl sha1 and the path/name:
openssl sha1 ./kali-1.0.9-bbb.img.xz
Which will return this:
SHA1(./kali-1.0.9-bbb.img.xz)= 5a51cee36593dfe1b31904c22395b307ea2aad50
If the checksums match, unarchive the .xz to a .img. If you prefer a GUI, try The Unarchiver, a free application in the Apple Store: https://itunes.apple.com/us/app/the-unarchiver/id425424353?mt=12
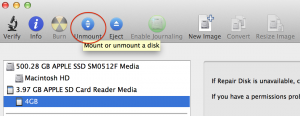
To clone the image, you’ll need to know the path of the sd card. If your comfortable using “df -h” from the command line or you are using linux, you can use it to find the SD card path. A quicker or safer way on the Mac is to click the Apple (upper left-hand corner) then click “About This Mac”. Click “More Info” then “System Report”. Under Hardware, click on “Card Reader” or USB” to reveal the path. The BSD name should be something like “/dev/disk1”. The number depends on how many disks you have currently mounted. Under Volumes, you’ll see something like “/dev/disk1s1”

Unmount the volume by typing the command below or by using the DiskUtility GUI.
sudo diskutil unmount /dev/disk1s1
If you prefer a graphical interface, run Disk Utility by clicking on the spotlight magnifying glass (upper right hand corner) and type “Disk Utility”, although it may find it after the first few letters. Hit Enter to run.
Highlight the volume (4GB below but whatever you named it with SDFormatter) and click on Unmount.
Make sure you’re still in the same directory that you unzipped the kali image to. On Linux, enter the following command, replacing sdx with your value
sudo dd bs=1m if=./kali-1.0.9-bbb.img of=/dev/sdx
On Mac OS X, enter the following command replacing diskn with the raw device address “rdiskn” Using the raw device address is about 10x faster and will save you HOURS!!!!
sudo dd bs=1m if=./kali-1.0.9-bbb.img of=/dev/rdiskn
With a SanDisk Class 10, 16 GB micro SD card that was labeled “40 MB/s Read”, typical image clone took about 6-7 minutes at about 2.67 GB/minute write speed. You can check the status by typing CTRL-T anytime during the copy. Some cards may take up to 30 minutes depending on the SD card write speed.
Once it’s complete, remove the micro SD card and install in the Beaglebone. Connect the HDMI cable, keyboard and mouse and if all went well, you should boot into Kali Linux!! If you prefer to run as a headless system, connect to ethernet and SSH in as root with password toor. If you have a USB wifi dongle, configure it for your wifi router while wired in or if you prefer, run startx from the keyboard/monitor and set up with wifi supplicant.
eighmy$ ssh root@192.168.1.17
root@192.168.1.17’s password:
Enter “toor” for the password… BUT…
Before you get pwned, change the password by typing “passwd” at the prompt.
root@kali:~# passwd
Now, update and upgrade your installation by typing “apt-get update && apt-get upgrade” at the prompt. This may take 30 minutes to several hours depending on your internet bandwidth.
root@kali:~# apt-get update && apt-get upgrade
If you’re familiar with Kali Linux, you’ll probably notice that the Kali suite of applications included in the ARM image are a subset of the 32/64-bit image. In future articles, we’ll go over installing some of our favorites that are missing but if you can’t wait, a simple “apt-get install myFavorite” should get you going.
Hopefully, this article helped get your Beaglebone set up and running Kali. If you have any questions, feel free to contact us or leave a comment.